

Now Reading: How to Prepare Your Designs for Clean and Smooth Stitching
-
01
How to Prepare Your Designs for Clean and Smooth Stitching
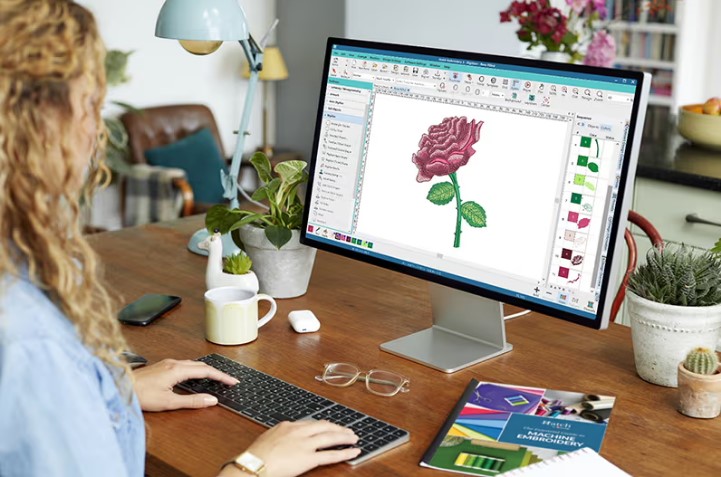
Embroidery is more than just thread and fabric. It starts with a good design. If your design is not ready, your final result will not look clean. Many people feel upset when their design looks messy after stitching. The truth is simple. Good stitching begins with proper design prep.
Many beginners skip the prep step. They think the machine will fix everything. But that is not true. You need to prepare your design before stitching. This process is called Digitizing Designs For Embroidery. It helps turn your artwork into a file that a machine can read and stitch with ease.
Why Design Preparation Is Important
Preparing your design saves time and effort. It also helps avoid errors.
Clean Final Look
A well-prepared design gives smooth and neat stitching.
Less Machine Errors
Good files reduce thread breaks and gaps.
Better Fabric Handling
The design fits well on the fabric and does not cause damage.
Understanding the Basics of Embroidery Design
Before you start, you need to know how embroidery works.
How Machines Read Designs
Machines do not see images like we do. They read stitch data.
This Includes:
- Stitch path
- Stitch type
- Stitch order
- Thread colors
Without this data, the machine cannot stitch your design.
Step-by-Step Guide to Prepare Your Design
Let’s go through simple steps that help you get clean and smooth stitching.
Step 1: Start with a Clear Image
Always use a good image.
Tips:
- Use high-quality artwork
- Avoid blurry images
- Keep edges sharp
A clean image gives a strong base.
Step 2: Simplify the Design
Simple designs stitch better.
What to Do:
- Remove small details
- Avoid tiny text
- Use clear shapes
Too much detail can cause problems.
Step 3: Set the Right Size
Size matters in embroidery.
Why:
- Small designs lose detail
- Large designs need more stitches
Always set size before digitizing.
Step 4: Choose the Right Stitch Type
Each part of your design needs a stitch type.
Common Stitches:
- Satin stitch
- Fill stitch
- Running stitch
Pick the right stitch for each part.
Step 5: Plan Stitch Direction
Direction gives life to your design.
Benefits:
- Smooth finish
- Better shine
- Clean look
Wrong direction can make the design look odd.
Step 6: Adjust Stitch Density
Density is the space between stitches.
Balance Is Key:
- Too dense = thread breaks
- Too light = gaps
Test and adjust for best results.
Step 7: Add Underlay
Underlay is the base layer.
Why It Helps:
- Keeps fabric stable
- Supports top stitches
- Improves shape
This step is often hidden but very important.
Tips from Real Experience
I have worked on many designs over time. I have seen what works best.
Keep It Clean
Clean designs always give better results.
Use Bold Lines
Thin lines can break or fade.
Test Before Final Use
Always run a sample stitch.
Common Problems and How to Fix Them
Even good designs can face issues.
Thread Breaks
This is a common problem.
Causes:
- High density
- Poor stitch path
Fix:
- Lower density
- Adjust path
Gaps in Design
You may see empty areas.
Causes:
- Low density
- Wrong stitch angle
Fix:
- Increase density
- Change direction
Fabric Puckering
Fabric may wrinkle during stitching.
Causes:
- Too many stitches
- Weak underlay
Fix:
- Reduce stitch count
- Add strong underlay
Choosing the Right File Format
Different machines use different formats.
Common Formats:
- DST
- PES
- EXP
- JEF
Always check your machine before saving the file.
Tools Used for Design Preparation
Experts use special tools for digitizing.
Popular Software:
- Wilcom
- Hatch
- Pulse
These tools help create smooth and clean stitch files.
Working with Different Fabrics
Each fabric behaves in a different way.
Cotton Fabric
Cotton is stable and easy.
Tips:
- Use medium density
- Basic underlay works fine
Polyester Fabric
Polyester can stretch.
Tips:
- Use strong underlay
- Adjust stitch settings
Caps and Hats
Caps are hard to stitch.
Tips:
- Keep design simple
- Stitch from center out
Why Experience Matters in Embroidery
Digitizing is not just about tools. It needs skill and knowledge.
What Experts Know:
- How threads behave
- How fabric reacts
- How machines work
A trusted name like Absolute Digitizing has real experience. They handle many designs every day and know how to get the best results.
Quality Check Before Final Stitching
Never skip testing your design.
What to Check:
- Stitch flow
- Thread breaks
- Final look
Run a test stitch on your machine. This helps avoid big mistakes.
Benefits of Professional Help
Sometimes, expert help is the best choice.
Better Results
Experts create clean and smooth designs.
Saves Time
No need to fix errors again and again.
Consistent Quality
Each design looks the same every time.
Services like Absolute Digitizing focus on quality. They make sure your design is ready for perfect stitching.
Mistakes to Avoid
Avoid these common mistakes to get better results.
Using Poor Images
Low-quality images give poor results.
Ignoring Fabric Type
Each fabric needs special care.
Skipping Test Runs
Testing saves time and money.
How to Build Trust with Your Designs
Good designs build trust with your clients.
Be Consistent
Always deliver clean work.
Focus on Quality
Do not rush the process.
Keep Learning
Stay updated with new tools and methods.
This helps you grow and build a strong name in embroidery.
Final Thoughts
Preparing your design is the most important step in embroidery. It sets the base for clean and smooth stitching. If your design is ready, your final result will look neat and professional.
Start with a good image. Keep your design simple. Use the right stitch types and settings. Always test your file before final use.
If you want the best results, working with experts is a smart move. A trusted service like Absolute Digitizing can help you create perfect stitch files with ease.
With the right steps and care, your designs will always look clean, smooth, and ready for stitching.
Related Posts

Stay Informed With the Latest & Most Important News
Previous Post
Next Post


-
 01Telugu Maitri |తెలుగు మైత్రి Best News-Blog telugumaitri.com
 -
 02Google gemini prompts | ఈ జెమినీ ప్రాంప్ట్స్ ట్రయ్ చేయండి
 -
 03Bigg Boss Telugu 9 Day 61 Promo |ఇంట్లో “War for Power”
 -
 04Today Top 10 OTT Movies List: ఈ 10 సినిమాలు మిస్ చేయొద్దు!
 -
 05Telugu Maitri (telugumaitri.com) Telugu Maitri News website post Full List
 -
 06Self Driving auto | డ్రైవర్ లేని ఆటోనా.. నిజమేనా..! అదీ మేడిన్ ఇండియా.. ఎక్కి కూర్చుంటే అదే తీసుకెళ్తుంది.. – Telugu News Today
 -
 07Laptop Charging While Using is a common, Top 10 tips, myths!