

Now Reading: How to Make Your Designs Sharp and Ready for Any Size
-
01
How to Make Your Designs Sharp and Ready for Any Size
Creating clean and sharp designs is very important. It helps your work look neat and professional. No one likes blurry images. Whether you print on shirts, hats, or posters, your design must stay clear at every size.
Many people face one big problem. Their design looks good on screen but bad when printed. This happens because the file is not made the right way. But don’t worry. In this guide, I will show you simple steps to fix this.
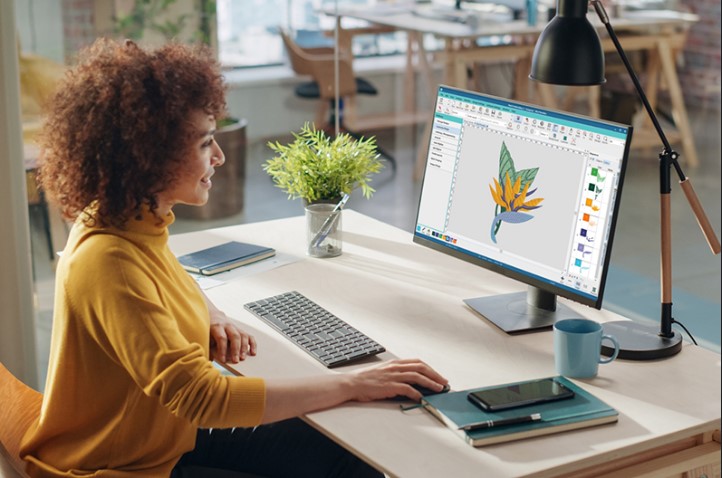
In many cases, the best solution is Vector Artwork Conversion. This method helps turn your design into a format that stays sharp at any size. It does not matter if you make it small or very big. The quality stays the same.
Why Sharp Designs Matter
A sharp design builds trust. It shows you care about your work. People notice clean lines and smooth shapes.
Better Print Quality
Sharp designs give better print results. The edges stay clean. Colors look bright and clear.
Works on Any Size
You can use one design for many things. It can be small on a cap or big on a banner.
Saves Time and Money
You do not need to remake your design again and again. One good file works everywhere.
What Makes a Design Look Blurry?
Before we fix the problem, we need to understand it.
Low Image Quality
If your image has low quality, it will look bad when you resize it.
Wrong File Type
Some files lose quality when you change their size. These are called raster images.
Poor Editing
Stretching or resizing an image the wrong way can break it.
Understanding Raster vs Vector
This is a key point. You must know the difference.
What is a Raster Image?
Raster images are made of pixels. These are tiny squares of color.
Examples:
- JPG
- PNG
- BMP
If you zoom in, you will see pixels. This is why they get blurry.
What is a Vector Image?
Vector images are made using lines and shapes. They use math, not pixels.
Benefits:
- No blur
- Easy to resize
- Clean edges
Simple Steps to Make Your Design Sharp
Let’s go step by step. These tips are easy to follow.
1. Start with High Quality
Always begin with a clear image.
Tips:
- Use HD images
- Avoid screenshots
- Check resolution
A good start gives a good result.
2. Use the Right File Format
Choose the correct file type.
Best Formats:
- SVG
- AI
- EPS
These formats keep your design sharp.
3. Avoid Stretching Images
Never stretch a small image to make it big. It will break the quality.
Better Way:
- Use vector files
- Resize in the right tool
4. Clean Your Design
Remove extra noise and rough edges.
How to Clean:
- Smooth lines
- Fix broken shapes
- Use simple colors
Clean work looks more professional.
5. Use Professional Tools
Good tools make your work easy.
Popular Tools:
- Adobe Illustrator
- CorelDRAW
These tools help you create sharp designs.
Tips from Real Experience
I have worked on many designs. I have seen common mistakes.
Keep It Simple
Simple designs stay sharp. Too many details can cause issues.
Use Bold Lines
Thin lines can break when resized. Bold lines are safer.
Test Before Final Use
Always check your design at different sizes. This helps you find problems early.
How Professionals Do It
Experts follow a clear process. This helps them get perfect results every time.
Step 1: Check the Artwork
They study design. They look for weak areas.
Step 2: Convert to Vector
They redraw the design using vector tools.
Step 3: Fix Details
They adjust lines, shapes, and colors.
Step 4: Test the Design
They resize it and check the quality.
Common Mistakes to Avoid
Many beginners make these mistakes.
Using Low-Quality Files
This is the biggest problem.
Ignoring File Format
Wrong format leads to bad results.
Over-Editing
Too many changes can harm the design.
Why Choose Experts for Better Results
Sometimes, doing it yourself is hard. This is where experts help.
Professional services save your time. They also give better results.
Benefits of Expert Help:
- Clean and sharp designs
- Fast delivery
- Correct file formats
A trusted name like Absolute Digitizer can help you get perfect results. They have the right tools and skills.
Making Designs Ready for Print
Printing needs special care.
Use CMYK Colors
Printers use CMYK, not RGB.
Check Size
Always set the correct size before printing.
Test Print
Do a sample print first. This helps avoid mistakes.
Making Designs Ready for Embroidery
Embroidery is different from printing.
Keep It Simple
Too many details do not stitch well.
Use Thick Lines
Thin lines can break during stitching.
Choose Right Colors
Use thread-friendly colors.
Experts like Absolute Digitizer understand these needs very well. They make sure your design works perfectly on fabric.
Final Thoughts
Making your design sharp and ready for any size is not hard. You just need the right steps. Start with good quality. Use the right format. Keep your design clean and simple.
If you want the best results, do not hesitate to get help. A trusted service like Absolute Digitizer can save you time and effort. They ensure your designs look perfect every time.
Follow these tips, and your designs will always stand out. Clean, sharp, and ready for anything.
Related Posts

Stay Informed With the Latest & Most Important News
Previous Post
Next Post
Previous Post
Next Post


-
 01Telugu Maitri |తెలుగు మైత్రి Best News-Blog telugumaitri.com
 -
 02Google gemini prompts | ఈ జెమినీ ప్రాంప్ట్స్ ట్రయ్ చేయండి
 -
 03Bigg Boss Telugu 9 Day 61 Promo |ఇంట్లో “War for Power”
 -
 04Today Top 10 OTT Movies List: ఈ 10 సినిమాలు మిస్ చేయొద్దు!
 -
 05Telugu Maitri (telugumaitri.com) Telugu Maitri News website post Full List
 -
 06Self Driving auto | డ్రైవర్ లేని ఆటోనా.. నిజమేనా..! అదీ మేడిన్ ఇండియా.. ఎక్కి కూర్చుంటే అదే తీసుకెళ్తుంది.. – Telugu News Today
 -
 07Laptop Charging While Using is a common, Top 10 tips, myths!